Get More Online Reviews | Dashboard - Review Requests
The Review Requests section of your GetMoreOnlineReviews.com account holds the key to leveraging a lot of your review power. From here you can launch one of GetMoreOnlineReviews.com’ most powerful tools: campaigns. Campaigns allow you to reach out to your customer base through a series of emails or texts. These campaigns allow you to request reviews from the customers you have served and direct your customer to your GetMoreOnlineReviews.com landing page. Campaigns have the ability to be scheduled so that the notifications go out over a series of days, and your customers are able to opt-out if they don't want to receive the information.
Review Request > Recipients
Add recipients one at a time:
The Recipients tab of the Review Requests section of GetMoreOnlineReviews.com is where you have the ability to add recipients one at a time, or bulk upload through a CSV/XLSX file.
To add recipients to your list of contacts, perform the following:
- Select the “+Add a Recipient” button.
- Fill out the form.
- Email: Select this checkbox if the customer has provided an email.
- Text: Select this check box if the customer have provided a phone number.
- First Name* (required): First name of the contact.
- Last Name: Last name of the contact.
- Tags (optional): internal keywords you would like associated with the customer for reporting purposes.
- Select “Add Recipient.”
- Individual should now show up in the In Queue tab.
Add multiple recipients via batch:
Upload CSV/XLSX:
- Select the “Upload CSV/XLSX” button.
- Choose a file to upload.
- Email and/or Phone.
- First name.
- Last name.
- Select the “Upload Csv Xlsx” button.
- Navigate to where your file is saved on your computer.
- Select the file and select “Open.”
- Organize Columns.
- Move the options from the “Columns from file” column to the “Expected for upload” column.
Caution:
If your headers do not match our guidelines, you will be prompted to match them after uploading the file.
- Select “Continue to Upload.”
Warning:
The CSV or XLSX file you select will need to include the following information in order to be uploaded correctly:
Once all of your contacts have been uploaded, they will show up in the “In-Queue ” tab. They will remain in this tab until they have been activated. Descriptions of all the recipient statuses can be found below.
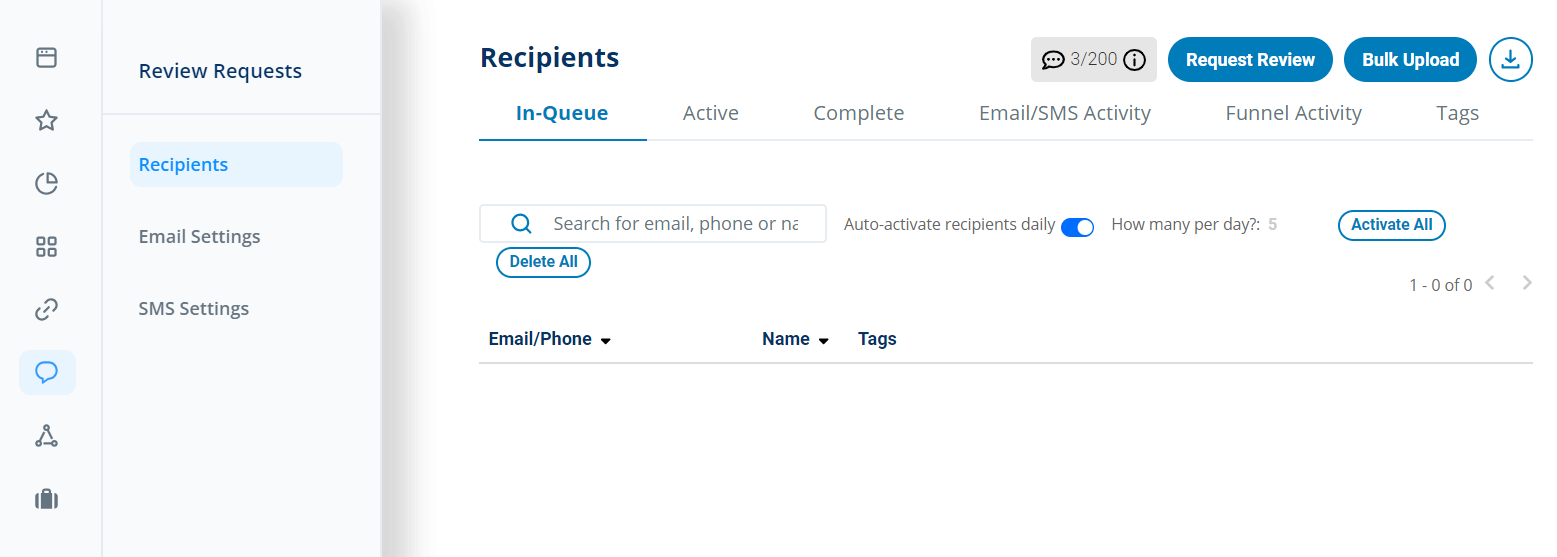
Review Request > Recipients > In-Queue
The In-Queue tab is where you will be able to see (and manage) all contacts you have uploaded. From here you can see the Email/ Phone, Name, any tags you have assigned, activate, delete, or unsubscribe a recipient from your Active campaigns. In-Queue Recipients will remain in this list until one of the following happens:
- They’re manually moved to the Active Recipients list (after clicking Activate all In-Queue Recipients or toggling the ‘check mark’ on/green.)
- They’re automatically moved to the Active Recipients list (you must toggle on Auto-activate In-Queue recipients daily?)

IMPORTANT:
Any contacts listed in the “In-Queue” tab will not receive emails or texts until they have been activated/ associated with a campaign. Once they have been activated they will be moved to the “Active” or “Complete” tabs and will no longer display in the “In-Queue” tab.
From the In-Queue tab you have the ability to “auto activate” recipients. This feature will automatically move a set number of recipients to your Active Recipients list every day (provided that there is enough room on the Active recipients list). To turn on this feature, set Auto-activate In-Queue recipients daily? to Yes. You can then set how many recipients per day you'd like to activate (the default is 10).
FYI
Recipients added via the Client or Staff forms will bypass In-Queue and go straight to the Active tab. If the Active tab is full, then they will appear in the In-Queue Tab.

Review Request > Recipients > Active
The Active tab is where you can see recipients who have been associated with a campaign. From here you can see all the same information you can see in the In-Queue tab, but these recipients are actively receiving emails or text messages based on the contact information that has been submitted. Customers in this tab will automatically be moved to the Complete tab once they have completed one of the deactivation actions:
- They receive all of the emails in the drip campaign sequence.
- They unsubscribe themselves from the list.
- They are automatically deactivated after opening an email, clicking through an email, or clicking through to a review site from your landing page (you must have turned these settings on in the Active tab under the Campaign Settings dropdown.)
- They submit a review directly to your review funnel landing page.
Review Request > Recipients > Complete
The Complete tab is where you can see customers who have either; received all email or text notifications, unsubscribed, or left a review. Complete recipients stay on the list for 180 days (unless you manually delete them or change the expiration date), after which they can be re-added as Active recipients. In most cases, Complete recipients cannot be re-activated. They must be deleted, then re-added as new recipients (the exception to this rule is available via an optional toggle on the Opt-in form only.) The system will prevent you from re-uploading recipients on the Complete list, thus preventing you from sending your campaign to the same customer twice. There is no cap on Complete recipients.


The Email/SMS Activity tab is where you can see what actions recipients have performed in regards to your campaign. You are able to track opens, clicks, unsubscribes, and bounces. Activity is logged in the Activity column.
- Opened means that the recipient opened the email, but did not click the link to the landing page inside.
- Clicked means that the recipient opened the email and clicked the link to the landing page.
- Unsubscribed means that the recipient unsubscribed themselves from the campaign using the link provided in the email (unsubscribes will also display for recipients still on the Complete list. A yellow ! icon will appear next to their entry in that list.)
- Bounced means that the email was not delivered to the recipient (bounces can be due to anything from the recipient having a full mailbox to their email server malfunctioning.)
You also have the ability to set three "deactivation" rules:
- Deactivate recipients on open?: Move recipients from the Active tab to the Complete tab after they have opened/read a text or email.
- Deactivate recipients on click?: Move recipients from the Active tab to the Complete tab after they have opened the link in a text or email.
- Deactivate recipients on clickthrough?: Move recipients from the Active tab to the Complete tab after they have clicked through the entire text or email.
The Funnel Activity tab is very similar to the Email/SMS Activity tab, except that it allows you to view the actions the customer took on your Funnel / Landing Page. You are able to track arrival, clicks, and what review site they chose. Activity is logged in th Activity column.
- Arrived from...: indicates how the customer appeared on your Landing Page (either through email or text.)
- Clicked “x” stars: indicates what rating the customer provided on your Landing Page.
- Continued to...: indicates which third party review site (of the ones you have linked) the customer selected to leave their review.

Note:
While GetMoreOnlineReviews.com can give you all the resources you need to lead your customer to your Landing Page, and then to the third party review sites, we cannot make them leave a review if they decide to stop at the last step. It is possible to see a customer click all the way through to the end, but not see a review show up in your review stream. GetMoreOnlineReviews.com is unable to track the review process through the 3rd party site.